Monday, November 30, 2009

Corn Collage

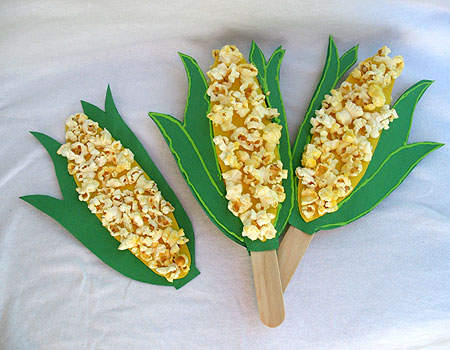
Fall means harvest time, and that means fresh corn on the cob! Share in the harvest with your kids this year by making this cute and festive corn collage to display.

What you'll need:

  • Yellow and green construction paper
  • Popped corn
  • Scissors
  • Jumbo craft sticks
  • White craft glue
  • Pattern
  • Lime green puffy or 3-D squeeze paint (optional)

How to make it:

  1. Cut out the pattern, cut the corn cob out separately from the leaves. Trace onto construction paper. You can get up to 7 corn cobs from one sheet of yellow construction paper and 3 sets of leaves from a green sheet of construction paper.
  2. Cut the corn cobs and leaves from the construction paper.
  3. Glue the yellow cob onto the green leaves.
  4. Put a layer of glue on to the yellow corn cob. Cover the glue with popped corn. Let dry. You can stop here if you wanted the simple version of this craft.
  5. Repeat the above steps to make a second corn, making sure that you will be able to glue them together back to back when you are finished. Line up the leaves to make sure.
  6. Use puffy paint to draw green outlines up and down the leaves. Let dry completely.
  7. Glue a craft stick to the back of one of the completed corn cobs. Sandwich the craft stick between two corn cobs, lining up the leaves before gluing together.
  8. When dry, you can insert the craft sticks into some floral foam or Styrofoam and display on your holiday table.

Tips:

  • Puffy paint usually takes a long time to dry. If you plan to use this step, be sure to allow for several hours of drying time.
  • If you would like to make the simple version of this craft a little sturdier, you can either use card stock instead of construction paper, or cut pattern from a piece of cardboards and glue corn collage to it.
  • Break pieces of popcorn up and glue the flat side to the paper, popped side facing outward.

Sunday, November 29, 2009

Thanksgiving Place Cards

Give your dinner guests a holiday surprise with these cut Thanksgiving place cards that are a great way to decorate your Thanksgiving table!


What you'll need:

  • Paper napkin in fall colors or orange construction paper
  • Small paper clips
  • Apple, any color
  • Almond, with or without the shell
  • Peanut in the shell
  • One Lifesaver candy
  • Two small wiggle eyes
  • Yellow construction paper
  • Hot glue gun
  • White craft glue
  • Marker

How to make it:

  1. Hold the almond point down and use white craft glue to attach eyes on rounded part. Let glue dry.
  2. Use hot glue gun to glue the ring-shaped hard candy to front of apple. Don't use white craft glue as it will cause the candy to start to liquefy and run down the apple (glue the ring-shaped hard candy on the apple's shoulders).  
  3. With hot glue gun, glue almond to ring-shaped hard candy (covering the hole, point down) and let dry. 
  4. Glue peanut below almond for turkey wattle.   
  5. Unfold napkin so it is approximately 6" x 11", then fold accordion style. If you don't have a napkin, you can use a 6" x 11" piece of construction paper.
  6. Pull ends of folded napkin together to make a fan. Secure with paper clip at bottom. Sit napkin behind the apple.
  7. Bend the end of the paper clip and insert into apple.
  8. Cut a piece of yellow construction paper into a rectangle to make a place card. Write your guest’s name on the place card.
  9. Use a paper clip to hold place card or glue a toothpick to the back of the card and insert into the top of the apple.

Saturday, November 28, 2009

Family Tree Leaf Pins

Who’s coming to your holiday dinner this year? Get everyone straight with these adorable and festive name tags! Make a bunch of blank ones and add names as family members arrive.

What you'll need:

  • Silk leaves
  • White card stock or construction paper
  • Pinking shears or other decorative scissors
  • Black marker
  • Pin backs
  • White craft glue
  • Other silk embellishments, such as berries, flowers, wheat, etc (optional)

How to make it:

  1. Glue 3 leaves together, layering them on top of each other, allowing a little of each to show from underneath the other. Repeat this for however many name tags you would like to make.
  2. This is an optional step, however, you may add fall flowers to some of the leaves, or berries, wheat, acorns, or any other silk embellishments you choose. Girls will enjoy the flowers whiles tags for boys work well with wheat and acorns.
  3. Using the pinking shears, cut out rectangles and squares for the name tags. Use your leaf arrangements as a guide for how big they will need to be. Leave enough room to write names on them.
  4. Glue the leaf arrangements to the front of the paper name tags, overlapping the paper so that there is excess leaf at the top (in the back).
  5. Glue the pin directly to the back of the leaf arrangement, above the paper. This will allow family members to continue using their name tag as a lapel pin by simply removing the paper name tag when they leave.

Tips:

  • Silk leaves are available in packages at local craft stores. Check the floral department for prepackaged leaves that are flat and easy to work with.
  • Hot glue can be used for the project and dries a lot faster than craft glue. However, hot glue can be so use caution.
  • For a little extra fun, have family members write a little bit of what they are thankful for on the back of their pin, then everyone can read theirs out loud at dinner.

Friday, November 27, 2009

Corn Cob Napkin Rings

The importance of corn to early Americans makes this fun and easy project especially fitting for Thanksgiving—and an attractive addition to your holiday table.

What you'll need:

  • Cardboard toilet paper tubes
  • Yellow and orange poster paints
  • New pencil with an eraser top
  • Scissors or craft knife

How to make it:

  1. Cut the toilet paper tubes into two-and-one-half-inch sections using scissors or a craft knife (under adult supervision). You will need one section for each napkin ring that you will make.
  2. Pour a small amount of different colored paints—yellow, red, orange, white, and black work well—onto a paper plate.
  3. Show your child how to dip the pencil eraser into some paint and practice stamping corn kernel shapes onto paper.
  4. Once she has mastered this printing technique, have your child hold the bottom of the ring and print rows of kernels all around the tube. Mix the colors as you wish.
  5. Set the tube rings out to dry.
  6. Place cloth or paper napkins through the rings and use them to decorate your Thanksgiving table.

Thursday, November 26, 2009

Coffee Filter Thanksgiving Bouquet

These easy Thanksgiving bouquet flowers will look gorgeous on your Thanksgiving table. All dressed up in fall colors, your relatives will rave about your artistic abilities!

What you'll need:

  • Basket coffee filters
  • Paper plate
  • Watercolor paints: brown, orange, red, yellow, green
  • Chenille stems: brown, orange, green, red

How to make it:

  1. Flatten coffee filter onto work surface (place some scratch paper or newspaper underneath).
  2. Paint coffee filter with watercolor paint. Thin the paint more in some areas to make the color lighter. Use whatever combination of colors you like. Set coffee filters aside to dry.
  3. When filter are dry, cut about 2” off the end of a chenille stem and set both pieces aside.
  4. Insert the large piece of chenille into the center of the coffee filter about 2” in. Hold onto the small end and turn the flower upside down so that the long end of the chenille is sticking up.
  5. Grasp the center of the coffee filter and gather it around the small end of the chenille.
  6. Twist the smaller piece of chenille around the gathered filter to secure the flower in place. Turn the flower back over and fluff the petals as needed.
  7. Bend the short end of the chenille into a ball in the center of the flower.

Tips:

  • No two coffee filters will look the same. Thin watercolors to make lighter shades and use thicker amounts for bolder shades. 
  • You can speed dry the coffee filters by laying them in a sunny window or blow drying them.  
  • Make your own designs by experimenting with different cuts and shapes.
  • When finished, consider planting your "flowers" in our candy corn luminary container.

Wednesday, November 25, 2009

Indian Corn Napkin Rings

Make these pretty little napkin rings to display on your holiday table. The fall colors are festive and represent the autumn harvest.

What you'll need:

  • Green construction paper
  • Scissors
  • Tissue paper: yellow, orange and burgundy
  • White craft glue
  • Pencil with an eraser

How to make it:

  1. Cut construction paper vertically in strips about 1.5” wide. Each strip will yield two napkin holders.
  2. Cut each strip in half to get 2 napkin holders.
  3. Cut tissue paper into 1” squares.
  4. Cover a 1” section of the construction paper strip with white craft glue.
  5. Twist a square of yellow tissue paper around the pencil eraser and push down onto the glue. Remove pencil, leaving the tissue paper on the construction paper.
  6. Repeat step number 5 with tissue paper, alternating orange and burgundy for every 2-3 yellow.
  7. Cover entire strip of construction paper, leaving only ½” at the end without tissue paper.
  8. Bend into a “ring” and glue together.
  9. Let dry completely then carefully insert a napkin.

Tips:

  • Save tissue paper from birthday gifts to use in future projects. 
  • Buy construction paper in value packs from discount department stores.  
  • White school glue is a suitable substitute for white craft glue.

Tuesday, November 24, 2009

Garland of Leaves

As guests arrive, have them write what they are thankful for on a construction paper leaf. Add them to your family thanks list garland!

What you'll need:

  • Construction paper: yellow, orange, red, green and brown
  • Black marker
  • Scissors
  • 48” of green yarn
  • Miniature clothespins 

How to make it:

  1. Cut out simple leaf shapes from construction paper.
  2. Have all dinner guests write things they are thankful for on a leaf.
  3. Hang a piece of yarn on the wall of from the fireplace mantel.
  4. Attach each leaf to the garland using a miniature clothespin.

Tips:

  • Miniature clothespins are available from your local craft store. 
  • If you don’t have clothespins, use paper clips or even tape to hold your leaves on the yarn.  
  • If you run out of room, start another!

Monday, November 23, 2009

Teepee Centerpiece

This Thanksgiving make these fun teepee centerpiece to display on your holiday table. A cute craft that takes almost no time to complete!

What you'll need:

  • Tan craft foam
  • 2 twigs
  • Scissors
  • Hot glue gun
  • Markers: brown, black, yellow and red

How to make it:

  1. Roll a piece of craft foam into the shape of a cone. Use hot glue gun to tack in place.
  2. Trim the top of the teepee on a slant.
  3. Break or cut twigs into 3” long pieces. Insert three twig pieces into the top of the teepee, glue in place.
  4. Decorate the outside of your teepees with fun Native American-inspired designs such as bear claws, eagles, stripes and geometric shapes.

Tips:

  • Craft foam is available in large sheets at your local craft supply store. 
  • Make sure your twigs are bug free before adding to your project.  
  • Always use caution when using a glue gun. Hot glue can hurt!

Sunday, November 22, 2009

Mosaic Cornucopia

The cornucopia, or horn of plenty, is the symbol of abundance often representing the fall harvest. As a result, fruits and vegetables adorn our holiday tables and symbolize the wealth of food for the coming year. Make your own cornucopia this holiday season!

What you'll need:

  • 1 sheet of plain white paper
  • 1 sheet pf black construction paper
  • Half sheets of construction paper: brown, black, purple, red, yellow, green and orange
  • White craft glue
  • Scissors
  • Pattern

How to make it:

  1. Place white paper over the pattern and trace the pattern lightly with a pencil.
  2. Trim white paper if needed to fit evenly in the center of the black sheet of construction paper. Glue in place.
  3. Tear (don’t cut) remaining construction paper into small squares, about ½” – 1” in size.
  4. Using the penciled pattern as your guide, glue torn pieces onto the white paper in this order:
    Brown – horn
    Black - horn mouth/rim
    Purple – grapes at top
    Red – apple to the right, below top grapes
    Purple – eggplant
    Red – apple below eggplant
    Green – leaves below apple
    Yellow – apple below top grapes
    Green and yellow – corn cob
    Green – leaves below corn
    Purple – grapes below corn cob
    Orange – pumpkin
  5. Glue torn pieces on for stems – brown for the grapes and pumpkin and black for the eggplant. You may also add stems for the apples if you prefer. Allow to dry completely.

Tips:

  • Use this project to help explain why we give thanks during the Thanksgiving holiday and how the cornucopia symbolizes our bountiful harvests.
  • Save extra torn piece for another mosaic project.
  • Hang this on the refrigerator or the front door. Add a piece of yarn to the back as a hanger or hang up with a magnet.

Saturday, November 21, 2009

Cotton Ball Corn Cob

Sweet corn is a lasting symbol of the Thanksgiving holiday. Make your own corn on the cob to celebrate the harvest season!

What you'll need:

  • 8”x 10” piece of green craft foam
  • 4-5 cotton balls
  • Yellow acrylic craft paint
  • Scissors
  • White craft glue
  • Paintbrush

How to make it:

  1. Cut a corn cob shape out of the green craft foam.
  2. Line center of the craft foam with white craft glue.
  3. Pull small pieces off of the cotton balls and roll into balls with your fingers.
  4. Place the rolled balls onto the craft glue. Continue this step until entire center of green foam is filled with “corn kernels.”
  5. Dip paintbrush into yellow paint. Paintbrush should be full, but not dripping.
  6. Using a dabbing motion, add paint to the cotton until mostly covered (see image). Allow to dry for about two hours.
  7. After paint has had a chance to dry, add more yellow paint where needed.
  8. Let dry completely.

Tips:

  • To make this project into Indian corn, use tan craft foam instead of green and add touches of burgundy, orange and brown paint through the corn kernels.
  • Make several of these and use as place markers for your Thanksgiving table. Simply write family members’ names across the green foam with a black marker.
  • This makes a fun classroom wall project. Have each child create a corn cob and build a cork wall with rows of corn.

Friday, November 20, 2009

Paper Bag Pumpkin Craft

This cute kids' paper bag pumpkin craft is perfect for table decorations or, if filled with candy, a great party treat bag. They are easy to make with simple supplies for a fun Halloween craft for kids.

What you'll need:

  • 1 brown paper lunch bag
  • Acrylic paint: orange and leaf green
  • Paintbrush
  • ¼ sheet brown construction paper
  • 6- 12” pieces of green raffia
  • Scissors

How to make it:

  1. Paint the outside of the lunch bag with orange paint.
  2. Paint the inside, top portion of the bag with leaf green paint. (See photo.)
  3. Paint a second coat of orange paint on the bag, only this time, paint the top outside portion with the leaf green-colored paint.
  4. When paint is completely dry, fringe the green section of the bag with your scissors, strips should be approximately ½” – 1” wide.
  5. Fill bag with crumpled newspaper (if using as a decoration) or candy and treats.
  6. Gather top of bag with your hand and tie a piece of raffia around it, just below the green section.
  7. Continue tying pieces of green raffia around the neck of the bag until all of it has been used.
  8. Cut a 1.5” wide strip of brown construction paper and roll up into a tube. Insert the tube of paper into the center of the green portion of the bag as the stem. If these bags are used as decoration, you can glue the stem in place.

Tips:

  • To reuse these decorations at Halloween, add faces as jack-o'-lanterns by gluing on yellow construction paper facial features.
  • If using these as party bags, you may want to grab all raffia pieces together and tie them into one knot to make them easier to remove rather than ripping the bag open.
  • To give the bags some weight, especially if they will be displayed outside, add a cup of sand or clean cat litter to the bottom of the bag before adding the crumpled newspaper.

Thursday, November 19, 2009

Felt Apples

With fall comes an abundance of apples. Make these cute little candy apples, caramel apples and apples from the orchard with felt foam balls.

What you'll need:

  • 3- 2” polystyrene (aka- "Styrofoam") balls
  • Felt: red, tan, burgundy, and green
  • 2 regular craft sticks
  • 1 miniature craft stick
  • Brown craft paint
  • Scissors
  • White craft glue
  • Pattern

How to make it:

  1. From tan, burgundy, and red felt, cut out the pattern.
  2. Place polystyrene ball in the center of the felt cross and glue in place. (See photo.)
  3. Glue left and right side up onto the ball first, the ends should meet at the top of the ball.
  4. Glue the remaining two strips of the cross up the side of the ball, tucking in any felt that may be sticking out.
  5. For the caramel apple, insert a craft stick down the center of the tan ball.
  6. For the candy apple, insert a craft stick down the center of the burgundy ball.
  7. For the orchard apple, first paint the top half of the miniature craft stick with brown paint.
  8. When dry, insert the unpainted end of the miniature craft stick down the center of the red ball.
  9. Cut two small leaf shapes from the green felt and glue to the top of the apple near the stem.

Tips:

  • These will make very cute gifts for your new teacher!
  • Felt is inexpensive and fun to use, be sure to have plenty on hand for impromptu projects.
  • For a fun twist, use 3-D brown fabric paint to add “chocolate” drizzle to the caramel apple!

Wednesday, November 18, 2009

Paper Cornucopia

This paper cornucopia craft would make a lovely addition to your Thanksgiving table. Although it looks impressive, it's super-easy to make!

What you'll need:

  • 3 sheets of 12" x 18" art paper or 6 sheets of construction paper
  • Clear tape
  • Brown paper lunch bags
  • Green, brown or black chenille stems
  • Acrylic paint: red, purple, goldenrod, orange
  • Newspaper
  • 1 sheet yellow tissue paper
  • 2 sprigs of plastic fall flowers and plants (wheat, seed pods, etc)
  • Raffia
  • Paintbrush
  • Scissors

How to make it:

  1. Crumple up a piece of newspaper. Open a brown paper bag and put the crumpled newspaper inside. Depending on the size you want your vegetables and fruits, add more crumpled newspaper. To form a ball shape, like an apple or a pumpkin, put the crumpled paper into one corner of the bottom of the bag.
  2. Twist the remainder of the bag to create a stem and wrap a piece of chenille around out to keep it tight. Trim off the excess bag (see image).
  3. To create an eggplant, follow step one above, except to make this shape elongated, add more paper above the existing crumpled paper, and then twist closed.
  4. To create carrots, take any remaining bag that was cut off as excess and roll it up, tape it closed (see image).
  5. Paint your vegetables and fruits, one coat will do and they do not need to be perfect (see image).
  6. While the paint is drying, create your cone. Line of all three pieces of art paper next to each other to create one large piece (36"x18"). If using construction paper, line two pieces up next to each other to create a 12x18 piece. Repeat two more times, then follow instructions above. Tape the seams to seal everything together (see image).
  7. Roll this into a cone shape, making sure to leave an opening large enough for your harvest. Tape closed and trim opening of cone if needed.
  8. Fill cone halfway with raffia (see image).
  9. Place harvest vegetables and fruits into the cone.
  10. Insert floral and wheat sprigs in randomly around your harvest.
  11. Roll up tissue paper and wrap gently around your cone and tie in a knot. Dot some glue on to hold it in place.

Tips:

  1. We did not glue any of the contents of our cornucopia. However, if you prefer, you can glue your items in using white craft glue, or for a faster solution, an adult can glue them in place.
  2. If you have enough time, you can glue the art paper or construction paper together and allow it to dry. This way you will not have the taped seams.
  3. Ideas for your bounty include: purple eggplant, orange carrots, red apples, orange pumpkins, and yellow squash.

Tuesday, November 17, 2009

Sunflower of Thanks

This is a great project to keep younger kids busy as guests arrive for Thanksgiving dinner. Put the kids in charge of collecting an "I am thankful for" messages on each petal, and then have them glue on to the paper plate to create the flower.

What you'll need:

  • 9" paper plate
  • 3-4 sheets of yellow construction paper
  • Brown acrylic paint
  • Black marker
  • Scissors
  • White craft glue

How to make it:

  1. Place paper plate, right side up, on work surface.
  2. Paint the center circle of the plate with brown paint (see image). 
  3. Fold yellow construction paper like a business letter to achieve three equal sized pieces.
  4. With paper still folded, draw a simple petal onto the paper (see image). 
  5. Holding the paper, still folded, cut through all three layers and cut out the petal. You should have three petals. Repeat this for as many petals as you need.
  6. As guests arrive, have them write their names at the top and a short description of what they are thankful for on the petal. Also have family members living in the house fill out their own as well (see image).
  7. Glue each petal onto the paper plate, lining up the bottom of the petal with the brown center circle on the plate.
  8. Hang the flower where all your guests can see it.

Tips:

  1. Our sunflower holds 10 petals. Be sure to paint enough plates to account for however many guests that will be at the party. If you are having a smaller crowd, fold the construction paper in half instead of thirds, to make larger petals.
  2. If you only have a few extra guests, but not enough for another flower, make leaves from green construction paper instead. Attach a piece of green yarn to the back of the flower, and then attach the leaves to the yarn.
  3. To hang your flower, you can attach a magnet to the back for metal surfaces, roll a few pieces of sturdy tape and stick on the back, or attach a piece of yarn to hang from a nail or thumbtack. You may need to tape some of the upper petals to the wall to keep them from drooping over.

Monday, November 16, 2009

Tree of Thanks

This charming centerpiece will be the talk of your holiday dinner table. If you have a small gathering, use a smaller branch, if you need more room, make more than one!

What you'll need:

  • Twig with branches
  • Heavy vase, container or basket with rocks
  • Floral foam
  • Silk leaves
  • White card stock
  • Black marker
  • Hot glue gun
  • American moss

How to make it:

  1. Fill container (we used an urn) with floral foam. Pack it in tight so that it doesn’t move around.
  2. Insert twig into the floral foam until secure.
  3. Hot glue one silk leaf for each member of your family that will be attending the holiday celebration onto the end of each branch.
  4. Write each family member’s name on pieces of card stock. Hot glue one name below each leaf.
  5. Arrange American moss over the top of the pot and hot glue in place.
  6. Place on the holiday table.

Sunday, November 15, 2009

Hands-and-Feet Turkey Craft

Children will enjoy tracing their hands and feet to create this one-of-a-kind paper turkey craft for Thanksgiving.

What you'll need:

  • Construction paper in brown, tan, orange, red, yellow and white
  • Scissors
  • Glue
  • Wiggle eyes (optional)

How to make it:

 Before You Start
  1. Find a place to work, and protect it with a large sheet of paper.
  2. Gather all your materials.
  3. Read all the directions.

Making Your Hands-and-Feet Turkey

Step 1 - Trace the child's hands and feet

  1. Trace two feet (with shoes on) on brown construction paper.
  2. Trace two hands on tan construction paper.
  3. Trace two hands on red construction paper.
  4. Trace two hands on orange construction paper.
  5. Trace one hand on yellow construction paper.

Step 2 - Cut out all the pieces

 Cut out all the hands and feet tracings.

Step 3 - Make the Body

Put the two feet tracings together to make the turkey body and head, placing the heels together one on top of another, and spreading the bottoms apart as in the illustration. Glue.

Cut two feet out of the orange scraps, then cut a diamond shape for the beak. Draw the eyes on white paper and cut them out, or use wiggle eyes. Make the wattle out of red construction paper. Glue each piece onto the body as shown.

Step 4 - Attach the tail

Glue the red, orange, and yellow construction paper hands behind the brown body to make the tail.

Step 5 - Wings

Position the two tan hands on either side of the body to make the turkey's wings and glue them in place.

You're Done!

Enjoy your decoration. Be sure to put the date on the back, so that in future years you'll be able to know when it was made.

Have fun making a whole flock of turkeysor enjoy making a turkey each year to chart how much your child has grown.

Tips:

Young children may need help tracing their hands and feet.

Saturday, November 14, 2009

Felt Turkey Pin Jewelry Craft

In the day before Thanksgiving or on the day itself, give guests and friends a special reminder with this felt turkey pin. This is a fun kids' craft that can be done at school or at home.

What you'll need:

  • Tan or brown felt for body and head
  • Golden brown or tan felt for feathers
  • Gold felt
  • Red felt
  • Two Tiny wiggle eyes
  • Tacky glue
  • Scissors
  • Pen
  • Safety pin (about 1" size)

How to make it:

 To make it easier, draw your shapes on felt before cutting them out.
  1. Cut out a 1" circle for the body of the turkey.
  2. Cut out a 1/2" circle for the head of the turkey.
  3. Cut out a heart (1 1/2" wide x 1 3/4" tall) for the feathers.
  4. Cut a little oval shaped (1/4" wide x 1/2" long) out of red for the gobbler.
  5. Cut a tiny gold triangle for the beak (1/4" wide x 1/4" long).
  6. Cut out tiny feet (use your imagination) out of gold felt (1/2" wide x 1/4" tall).
  7. Cut a square of felt for the back of the turkey to hold the safety pin.
  8. Glue round body close to the middle of the heart shaped felt piece.
  9. Glue the round head overlapping the top of the round body.
  10. Add glue to the top of the wattle on the underneath side.
  11. Pull up the bottom part of the head and slip the wattle under it. Press down firmly.
  12. Glue twowiggle eyes on the head.
  13. Glue the beak near the bottom of the head (see picture).
  14. Glue the feet at the bottom of the body.
  15. Turn the turkey over. Open the safety pin. Lay the square of felt over the back (non-opening side) of the safety pin. Glue the square in place.
  16. Let dry. Wear and enjoy.

Friday, November 13, 2009

Craft Stick Turkey Greeter

This project is easy to make and uses minimal supplies. Poke the turkey's stick into an upside-down paper cup or hang on the edge of a flower pot.

What you'll need:

  • 10 jumbo craft sticks
  • 2 medium wiggle eyes
  • Miniature craft stick
  • Small scrap of paper
  • Sharpie marker
  • Felt (white, black, goldenrod, and red)
  • Acrylic paint (brown, orange, yellow, and red)
  • Scissors
  • Hot glue or white craft glue

How to make it:

  1. Paint the jumbo craft sticks: four brown, two yellow, two red and one orange. Leave one unpainted.
  2. Cut one-half an egg shape (body) from the goldenrod felt, approximately 2 1/2 x 3 inches.
  3. Cut a small elongated triangle from the goldenrod felt for the beak.
  4. From red felt, cut an elongated heart shape, about one-inch long.
  5. From black felt, cut a simple top hat and a small rectangle for the buckle.
  6. From the white felt, cut a small rectangle for the buckle a little bit larger than the black one.
  7. Lay the plain jumbo craft stick on the table. This will be your base stick.
  8. Starting from the right, glue craft sticks into a fan shape, stacking one on top of the other as you go. Our pattern goes brown, yellow, red, brown, yellow, red, orange, brown.
  9. You should have one brown craft stick left over. This is your turkey's body. Glue it straight up and down onto the middle of the fan shape.
  10. Glue goldenrod body in place. Next, glue the gobbler (red heart) just above the top of the body.
  11. Glue the beak in place just above the gobbler.
  12. Glue wiggle eyes above the beak.
  13. Glue hat onto top of head, then glue white rectangle on hat and black rectangle onto the white one, creating the buckle.
  14. Write "Happy Thanksgiving" on a small piece of paper or construction paper. Glue to miniature craft stick, then glue craft stick to body.
  15. Allow to dry completely.

Tips:

  • If this is a class project, break it into steps. Paint one day, cut another, glue the next.
  • Some craft stores carry packages of colored craft sticks.
  • Put a fairly heavy rock in the center of a paper plate. Glue an upside down paper cup to over the top of the rock. When dry, insert the craft stick into the top of the cup for a fun Turkey Greeter holder.
  • Alternatively, you can use construction paper for the feathers so that your turkey lays flat. Use the "sign" for each guest's name and use as place holders for dinner!